You will need:
-1/16" x 4" x 24" bass wood(http://www.hobbylobby.com/Crafts-Hobbies/Wood-Crafting/Unfinished-Wood/1/16%22-x-4%22-x-24%22-4%22-Wide-Basswood-Sheets/p/29804)
-All purpose glue(I use Aleene's)
-Paint
-sandpaper
-craft knife/box cutter
-legs(I used stair spindles. You can use any 1/8" dowel.)
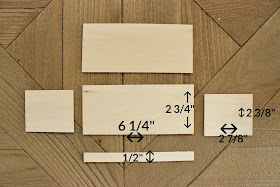
First, let's cut the wood. I used a small box cutter. A craft knife works too.
You need a back piece and bottom piece(same size): 6 1/4" x 2 3/4". The 2 side pieces are 2 7/8" x
Lets make the back of the bed a little more interesting by cutting a nice detail at the top. I cut 2 1/8" from the side and 3/8" from the top. Now the sides of the bed will be even with the back where they meet at the corners.
I drew a line all around the back and 2 sides 1/4" from the edge. I'm going to cut a channel all around to make a nice groove detail. I used the Xacto knife to cut and lift the wood. Don't cut too deep. We only want to take off one layer of wood.
Remove the wood inside this little channel you cut. Sand inside the groove. Also sand all the edges of your sides and back pieces of the day bed.
It's now time to glue the bottom of the bed. I marked all the pieces to make sure the bottom will be straight. I drew this line 1/2" from the bottom. We'll be using the 1/2" rail we cut out earlier in the front of the bed under the bottom.
Glue everything together. I glued the bottom to the back first and then each side. Lastly, I glued the 1/2" rail to the front, under the bottom and between the sides.
Let the glue dry completely(or the wood will warp and un-glue with the paint).
To make the pretty decorative relief I used cardstock and cardboard. To make a flower, I used cardstock cut into a flower shape. The flower shape is 3/8". I use 3 flower shapes to make 1 rose. The middle is rolled and glued onto one flower shape and then glued onto one more flower shape.
The leaves are cut out of cardboard(like the cardboard from a cereal box).
Make a pretty composition.
You will want to harden the flowers or they will loose their shape with the paint. I used Modge Podge. You can also use white glue. Let dry completely.
The legs of the bed are 1 1/8". I used stair rails that I cut to size. But a simple dowel 1/8" in diameter works too.
Glue your legs in place and allow to dry completely.
Once everything has dried, we can paint! For a true shabby chic I would first paint this bed grey, let dry, cover with glue, let that dry for 5 minutes and apply a thick coat of white paint. You would get a gorgeous crackle effect. For this bed I painted mine with 2 coats of white.
Then I took a pencil that I cut with my box cutter to expose more of the lead and applied it into the grooves and around the edges. The more you apply the more dramatic the effect. I did mine pretty light.
Once you wet the lead with your last coat of white paint, you will get a soft grey highlight to all the places where you applied the lead.
The mattress base is a piece of cardboard 2 5/8" wide x 6 1/8" long. I hot glued some stuffing/pillow filler on top of the cardboard and trimmed it neatly. There's 1 3/4" of stuffing on my bed.
Next, I covered with fabric. The fabric piece is 8 3/4"x 4 3/4".
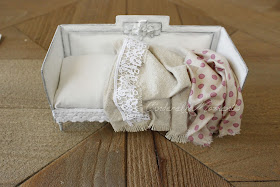
Hot glue the cardboard mattress to the bed. Now dress the bed with bed skirt, blankets, pillows. I put a dot of glue to hold the blankets in place. Some places I used hot glue.
 For the pillows, I fill them with candle filler sand. This makes the pillows heavier and more realistic.
That's it! You're done. Enjoy your new daybed!


That´s very cozy
ReplyDeleteBritt
Muchas gracias por este estupendo tutorial. Me encanta esa cama.
ReplyDeleteGreat tutorial! Thanks, Caroline!
ReplyDeleteThanks very much for this tutorial Caroline! Your french daybed is Very Lovely, and I hope to soon give this project a try! :D
ReplyDeleteelizabeth
Really cute and looks fairly easy to assemble. I'm making one! Thank you for sharing your secrets.
ReplyDeleteHello Caroline.
ReplyDeleteThats a very cute and beautiful bed. i have to try sometimes that crackle effeckt with glue and paint.
Best Regards:Lea
It's very pretty. Thank you for showing the tutorial. hugs, Marisa
ReplyDeletewow great, I'm going to try to make this!!
ReplyDeleteMarja
Thank you for the tutorial. Your daybed is really lovely!
ReplyDelete-Now I think it's time of my beauty sleep. :)
Preciosa Caroline !!!!, muchas gracias por ese fantástico tutorial.
ReplyDeleteMe encanta.
Besos
I love! Beautiful!
ReplyDeleteMini hugs, my friend! :0)
What can I say, again a wonderful tutorial of you. Thank you very much.
ReplyDeleteLG Alexandra
Te ha quedado preciosa,encantadora!!! Muchas gracias por el tutorial!!!
ReplyDeleteBesos.
This is absolutely adorable! Thank you so much for the tutorial! I love the idea of using candle sand for the little pillows, fantastic!!!
ReplyDeleteA fantastic tutorial, your style is always amazing.
ReplyDeleteGeneviève
Thanks for this beautiful tutorial. Your bed is so nice.
ReplyDeleteSweet! I love the flowers.
ReplyDeleteKristin
Te ha quedado muy bonita. Gracias por el tutorial.
ReplyDeleteUn abrazo
Maite
Zo knap weer van je bedacht het zet er zo echt uit zou er zo in kruipen super gemaakt Caroine lieve groetjes Daniëlle
ReplyDeleteGreat tute!!! I love the little daybed and will have to make one. Thanks for the tute. hugs, lj
ReplyDeleteThank you for sharing this tutorial! Your daybed looks so lovely and cozy it makes me sleepy!
ReplyDeleteits a darling bed!
ReplyDeleteVery stunning.
ReplyDeleteSo grateful for you Caroline, you have made my Hope's & Dream's become tangible! I don't know how to post a picture but my attempt at this came out amazing! I haven't painted or cozied it up with linens yet. Really wish I could figure out how to post a pic.
ReplyDeleteI think I will make one a little larger for Blithe and Licca. This is a beautiful tutorial. Thank you.
ReplyDeleteI want to make a sewing room/spare bedroom and this is perfect for that. Thank you.
ReplyDelete