Friday, July 31, 2015

Dollhouse Custom Construction Tutorial Part 2 - Featuring Lilac Cottage

Let's continue building the custom dollhouse with this part 2 tutorial post. Since the last step, I added a front wall to the bump out section in the front of the house. It has 2 long narrow windows.  Plastered this wall and painted it with primer paint. 
 The next step is putting on your wallpaper. I picked a floral, a ridged cardboard and a linen fabric.  The floral paper comes from the internet. Pinterest is a great place to find printable paper. Just type wallpaper in the search and you'll see tons appearing.  The ridged paper is my wainscoting. This one comes from the scrapbook isle of the craft store. As does my linen fabric.

 After the wallpaper, I did the ceiling. I also used a 3D textured paper from the scrapbook section. It has a very subtle design. Then I did the beams. These are just Popsicle craft sticks. They are 3 sided box like. I make these directly on the ceiling.  Then I do the wood floor also with craft sticks. I like my floors to go from front to back. I feel like it makes the space more open and clean.
 You can then start all your trims. They are all done with  craft/Popsicle sticks. I have a double trim for the crown molding near the ceiling, a single for the baseboards, and some to frame the windows and walls too. This wall with the window will be the kitchen area. So I'm not putting baseboards here for now. I'll wait until my sink and stove are in place.
 The stair opening is also framed with craft sticks. I always leave a space with no trim where the mantel will go because I want the mantel to fit right up to the wall.I also left room free of trim where my stairs will go.
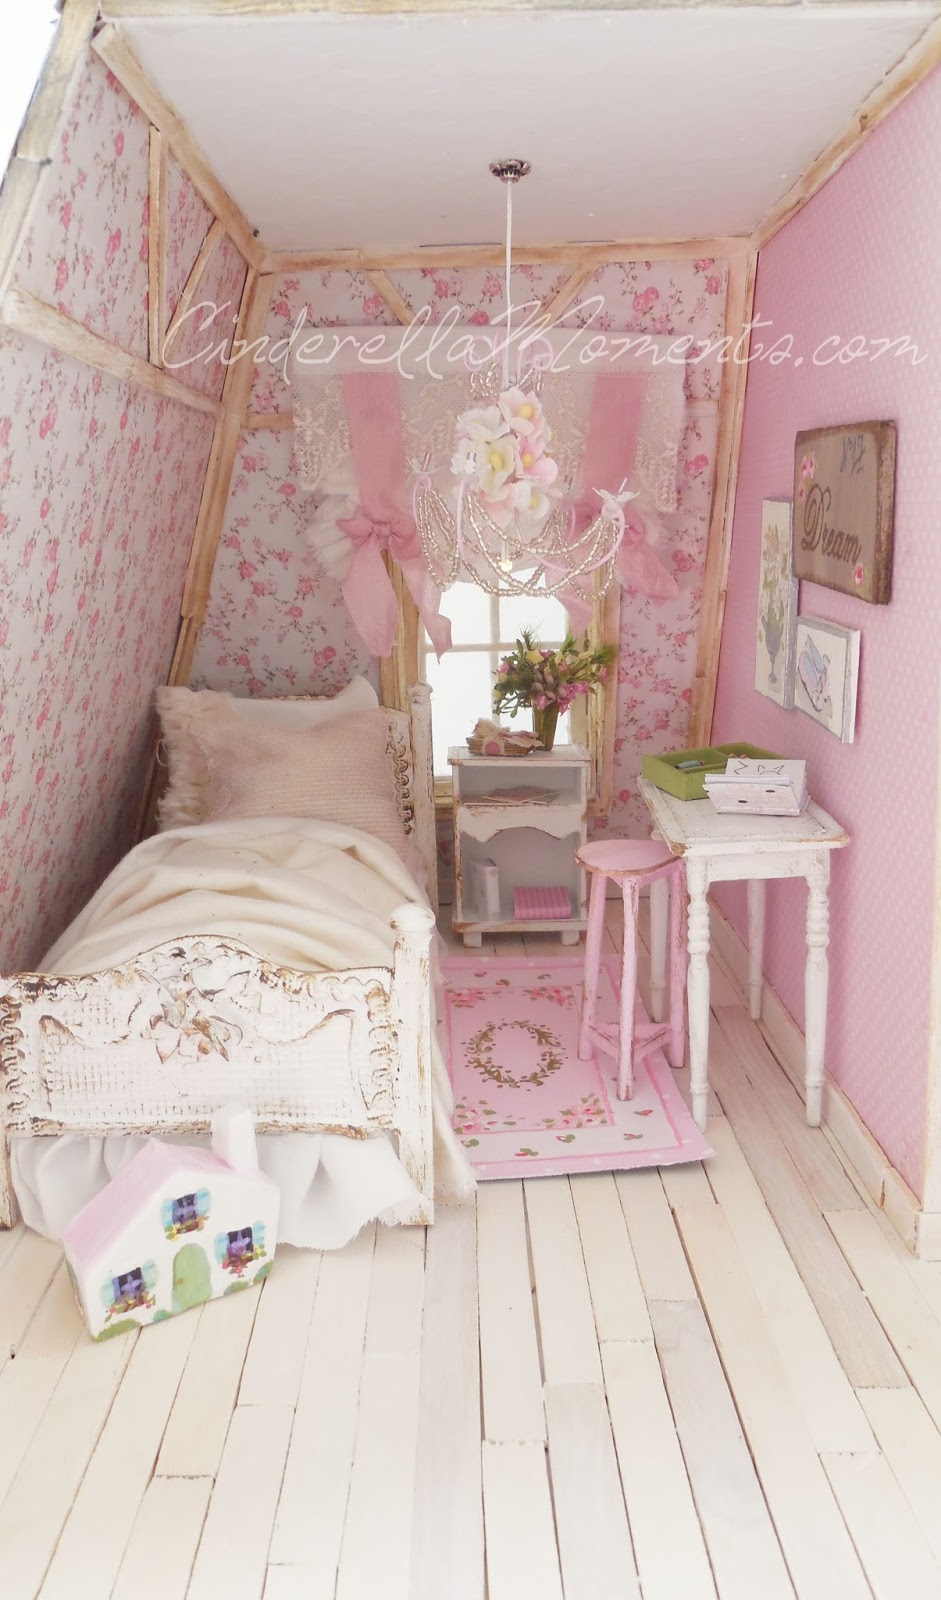
 Here you can see the front wall of the bump out with its 2 windows.
 I also added 2 pieces of wood to make my landing upstairs. And I wanted to add a vintage look with these 2 planks showing downstairs.
 The trim is now painted. I used a white wash. Just add a lot of water with your white paint.
 The floor color is several steps for depth. First, it gets the same white wash treatment as the trims and beams. Let it dry. Sand partially and do another wash. This time with grey paint mixed with water.
 My french door is from Ebay.  I painted it white. The door came with an interior trim so I glued that in place with Aleene's Tacky Glue(an all purpose white glue). I also installed my chandelier. Here's the tutorial for chandeliers: http://www.cinderellamoments.com/2011/11/chandelier-tutorial.html
I also added a light above where the mantel will be. I used a jewelry end cap on top of the bulb as my light fixture. You can glue this to the ceiling with regular glue or hot glue. I get my LED lights here: http://www.modeltrainsoftware.com/mi.html  They also have fire kits for inside your mantel.
I have painted some stairs and glued them in place. These are from Hobby Lobby. http://shop.hobbylobby.com/products/miniature-simple-stair-kit-606889/  They are 14.99 plus you can use your 40% off coupon.
 I then started the upstairs. I put on a front wall that is 15 1/2" x 3" tall. This is so the roof is not too slopped for the rooms upstairs. Otherwise, you get tons of unusable space. This also makes the upstairs taller.  I had the two triangles for each end of the upstairs from a kit. I decided to use them here. I propped them up on a  bottom piece of wood so they would be the correct height that corresponds to the front. These two side walls are now 18 1/2" tall.
I did my upstairs wood floors exactly like downstairs. Don't worry about upstairs walls for now. Just do the entire floor with craft sticks.And paint.

To make the back look finished I added trims around the edges. All 4 sides have trim.
 Here is the exterior view of the side walls.

 Here you can see the stairs. They are painted white with grey treads and banister.


 The last step for this second part of the tutorial is to make a little triangle top for the front bump out section.  I plastered it and painted it with primer paint(paint with primer already mixed into it).  This wall is now 14 1/2" tall.
 
Today is Lizzie's birthday! She's 6 years old. We have a big party planned. Her favorite song is "Happy Birthday". So she will be thrilled that everyone is singing it for her. It's a miracle she is here on earth. This tiny girl had a rough start with her birth and had subsequent health problems. But we have found a way to manage. So celebrating her is an absolute must. She's definitely a survivor with a love of life bigger than anyone I know. Happy Birthday sweet Lizzie!
Thank you everyone for coming over. I hope you are enjoying the building tutorial. If you see anything I forgot to explain please leave a comment below.  Have a great day!
hugs♥,

Friday, July 24, 2015

Dollhouse Custom Construction Tutorial Part 1- Featuring Lilac Cottage

For the next few posts I want to take you through my building process of a custom dollhouse called Lilac Cottage(commissioned by Jen).  I want to show you that there is no need to be afraid of failure. It's all quite easy and you must stay relaxed about each step. No need for perfection which I think is what scares most people from even trying this hobby out.
 First, come up with a plan. I draw out a sketch of what I think I want the house to look like. Stay open to changes during the building process. Sometimes things don't work out and you have to think of solutions which could change your original plans. As my kitten Gigie is teaching me- "no worries."  She's quite a relaxed little girl!
My wood is a craft plywood 1/8 x 12 x 24".  I found it at Hobby Lobby item#117853 for $4.79. They also have it at Michael's craft store for a little less I think. I just can't find the link online.  I also use left over pieces from kits. You can see this on the right wall with the little window.  Whatever you have works because in the end it will be covered with all sorts of materials including concrete.
All my dollhouses basically start off looking like the above photo. Just a box with cut outs.  As I said in the previous post I use the Dremel Trio and box cutters to cut my wood. The consensus on my last post about cutting tools seems to be scroll saws are the way to go. So I will order one and let you know how I feel about it, which method is better, which is easier and which is less scary. :) LOL!
I usually use hot glue to hold all the parts together. Then go back over all the seams with wood glue. It's sturdy as a rock and no clamping and waiting!  If you use heavier, thicker wood then you'll want to also use some small nails.  I do this for Blythe 1/6 scale houses and MDF houses. 
I'm using  pre-made french doors as my entry door for this house. My windows will all be custom.  If you intend to use store bought windows and doors get those first and then trace out your placement on the house to cut out.
My stair opening is towards the back of the house. It's 4 1/4 x 2 3/4 and about an inch from the back of the dollhouse.
I added a little bump out section and plastered with Dap's Spackle/Patching Plaster.  As you see in the photo my cuts are not perfect. But everything gets covered up and you will never see the imperfections in the end.  The beginning looks rough. Don't let that scare you. I promise the end product will be gorgeous.
My walls are 9 1/4" tall. The house's floor sits 1" above the ground. I added a 1" piece of wood under the front of the house and around the sides of that front piece and the back of the house. The walls are cut out the right size so no need to add an inch here.  It's a matter of preference. But I don't want the floor of the house to be level with the surface the house will be displayed on. That means that the interior walls are 8 1/4" tall.
 This house is 15 1/2" x 18 1/4" deep.  I'm restricted by size because of shipping restrictions/prices. But you can make your house as big as you need. This cottage is big enough for a livingroom, kitchen, reading nook or craft space, stairs, and 2 rooms upstairs.
I sanded the plaster to a nice smooth finish. I'm going to coat this with a primer so the wallpaper will adhere nicely to the wall.
I also start making and acquiring pieces for the interior. I set everything on the top of my Robin egg blue Ikea cart.  That way I can see how everything looks together and keep my theme in mind. Here you see some wallpaper which is regular paper printed from the internet. In front of that is a bookshelf and chair that's actually for sale in my Etsy shop. But I set it in front of this paper and I'm actually loving it.  I've also made my mantel with whales on top, 2 lace upholstered chairs, crystal chandeliers(go to my tutorial page to see how to make these), and a few accessories too.  I'll just keep adding stuff in here until the dollhouse construction is done. It's a great way to stay organized and on track.
You're done with part 1! Time for a snack. :)
hugs♥,

Wednesday, July 22, 2015

Dollhouse Cutting Tools I Use

I'm often asked what I use to cut out my dollhouses.To tell you the truth I have not found that perfect saw. If you are a saw manufacturer out there and you think you have the perfect compact tool to work on dollhouses contact me. I'd love to share your product with my readers. Until that happens let me tell you what I use.


They are very simple tools actually. My favorite thing to use is box cutters.  Along with a metal ruler they do an excellent job with precise, clean cuts. If the wood is a little thick I cut both front and back sides. It usually works.
But when the wood is way too thick and too hard it requires a power tool. A few years back I bought a Dremel Trio. Come to find out it's been discontinued!  The good thing about the Dremel is that it's pretty compact(compared to most saws and routers). The bad thing is that the cuts are pretty ugly!  After I cut out windows and doors I have to sand each side straight. And don't forget earplugs or your ears will be ringing for hours. 
Before the Trio I had tried several rotary tools like the Back and Decker and Dremel with saw attachments. But the saw blades burn out. And I must admit it's a little scary to have that little spinning wheel of sharpness ready to take off digits with any false move. 
Maybe a scroll saw? I'm not sure. If any of you have experience with a scroll saw leave a message after this post. I'd love to hear your opinions. At this point I've decided to stop wasting money on useless tools that don't work for dollhouse purposes and keep piling up in my workspace. But I'll keep looking. If that perfect cutting tool should ever fall into my hands I will most definitely share it with all of you. 
Good luck and be careful out there!
hugs♥,

Friday, July 17, 2015

Easy Peasy Dollhouse Stained Glass Windows Tutorial

Stained glass is a fabulous way to give your dollhouse a vintage look. And it's super easy to do too.

I used very simple materials:  1/16" thick bass wood, metallic marker color of your choice, black ultra fine point permanent marker, Aleene's Tacky Glue(really any white glue works. Even ModPodge works!), acrylic paint color of your choice, a small paintbrush. And if you need clear plastic for your window you can use transparent copier sheets or you can find clear plastic sheets at the craft stores. If you have a Hobby Lobby nearby check the stained glass making area. 
First, you will need a pattern. Pinterest is a great place for inspiration.  Draw your pattern onto paper and place your piece of transparent sheet over it. Make sure you leave a 1/8" perimeter to affix the frame. Trace pattern on the clear sheet with the black ultra fine point permanent marker.  If you don't have a fine marker your pencil will work too. It will be just a little harder to see the design.
Trace over the black marker lines with your metallic marker.
For the spaces you want clear just apply the glue with a paint brush in between your metallic lines. Apply 2 or 3 coats if you want more of a waterglass effect.
For the colored areas mix a little dab of paint in with the glue before you apply it on the plastic film. A 50/50 ratio.  Brush it on in desired areas.
Now the frames can be done 2 ways. Either as a solid frame by cutting out the interior or by having each of the four sides cut individually.  My solid frames are 1 1/8" x 1" with a 1/8" wide perimeter.  My other frame is also 1/8" wide and all the sides are 1 1/4" long.  I cut these out of 1/16" bass wood with a small box cutter.  You will need a front and a back frame if you plan to hang these in a window.
Paint the frames. I used a single coat of white acrylic paint to look more vintage/old.
Glue the frames on both sides of the plastic film with all purpose white glue.  Let dry.  You may want to add a thin piece of 26 gauge wire to hang the window. String also works.  Just drill 2 little holes with a pin at the top of the frame. Place a dot of glue on each end of the wire and stick in the hole. Let dry.
 That's it! Now you have a gorgeous little piece of art for your dollhouse! 
hugs♥,

Monday, July 6, 2015

Danielle's Maison de Campagne Custom French Style Dollhouse

My latest commission is for Wilma and her daughter Danielle. They chose the Maison de Campagne but with a more girly interior.
 I also wrote the book to build this house. It should be available soon.
 The wires, batteries and switches are in the chimneys.
 I used concrete on the exterior. This is premixed stuff that comes in a little tub so you don't have to deal with concrete dust. It's by Dap.

 Inside it's very romantic and very shabby chic.

 I made most of the furnishings.


 I think this is the coziest shot!


 My vintage stove which you can build with this tutorial: http://www.cinderellamoments.com/2014/04/vintage-style-dollhouse-miniature-stove.html

 I did another working fireplace. A lot of links to materials is on my Resources page at the top.  If you don't see something I used just ask me. I'll be glad to tell you where I got it! :)


I did write a book on building these doors. The link is on my sidebar to the right. Or you can get the PDF in my Etsy shop.
Thank you so much for coming over!